Hi there!
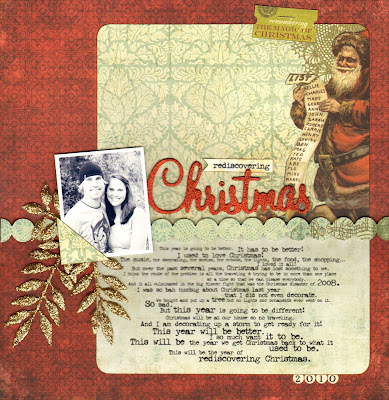
Over on the message board a couple of people had questions about how I did the typed journaling on this layout I made using the Bedford Falls kit.
Well it is not basic typed journaling that you would do in Word.
I actually used Photoshop!
So I thought I would hop over here and try to walk you through how I did it.
****
PREFACE...
I am very much a paper scrapper!
This journaling technique is about as close as I get to digital/hybrid scrapping.
That being said, these instructions are going to be very elementary!
And that is not because I am trying to talk down to you.
No way!!
I just don't know all the technical, fancy computer/Photoshop terms, etc. etc.
ha!
****
OK here goes...
{I am using Photoshop Elements}
Once you open Photoshop, go to
File > New > Blank File
Then a box pops up this is what I put in there:
“Preset” is Custom.
Then I make my “Width” 8.5 inches and “Height” 11 inches because that is what size my printer is going to print.
I have no idea what “Resolution” is but mine defaults to 72 pixels/inch so that is what I leave it on.
“Color Mode” defaults to RGB color and that is what I leave it on.
“Background contents” are white.
Now you have a blank canvas to work with!
Look for the “Horizontal type tool”.
It looks like a capital T.
For all you University of Tennessee fans, it looks like your T.
:)
With the “Horizontal type tool” you can pick the font, color, and size that you want.
You can also use it to drag your typing and move entire phrases/sentences/paragraphs around the page.
OK so click on the “Horizontal type tool”.
Then go click somewhere on your blank canvas.
Now what you have done is create “Layer 1”.
{the layers show up on the bottom right corner of my screen}
Try typing something. What you are typing is your “Layer 1”.
If you hit “Enter” you will create another layer: “Layer 2”.
And so forth.
So basically what I did on this layout is create a layer for each line of my journaling.
{I ended up with like 17-18 different layers. Each layer was a different sentence basically}
By doing that I can move each line around and change the size of the font.
Take the first 3 lines of my journaling for example:
“This year is going to be better.”
“It has to be better!”
”I used to love Christmas!”

Each of these sentences is a separate layer.
You know how in Word everything is so evenly spaced like single or double-spaced??
Well by doing your journaling this way, you can move your sentences around to create as little or as much space as you want between your lines instead of having to stick with what the program makes you do.
It is fairly easy to move between layers to make edits and stuff.
All you need to do is click on the layer ("Layer 1", "Layer 2", etc) over on the right side (not actually on your canvas).
Once you click on the layer over on the right, you can go back to your canvas, click on that sentence and make edits.
It is almost like clicking on the layer over on the right brings to life that layer on the canvas and you can edit it.
If you have not clicked on a layer, then you cannot adjust it.
Then once you have all your journaling like you like it, you are ready to print it out!
Cut your patterned paper down to the size of your printer.
Feed it through your printer like you would regular printer paper and print away!!
Gosh, I hope I explained that process so it makes
some kind of sense!
My recommendation: play with it and experiment!
Get the hang of how your Photoshop works!
Let’s discuss!
I will start a thread on the message board if you have any questions or need me to explain something better!
Happy scrappin’!!
gretchen


