


There have been quite a few techniques shown lately so I decided to go with some tips I have learned over the last few years. Some you may already know about and some you may not…
Jammed Punches:
Try popping them in the freezer for a bit. Heat expands metal thus causing them to get jammed on occasion. By cooling the metal part of the punches they should then become “unstuck”.
Sharpening punches:
Tear you off a piece of aluminum foil( I use the heavy duty) and punch through the foil a few times (I usually punch through at least 10 times). That will sharpen your punches.
Stiff Punches:
Use wax paper that you have folder a few times to punch through. By doing this you will lubricate your punches if they are stiff.
Mixing Paint colors
Use a freebie CD (like the free aol cd’s you can get almost anywhere) and place on top of a glass of water to act as a paint pallet. You can use the hole in the top to drop your paint brush into for easy clean up. Wash the CD and reuse it again next time.
Ink Pads:
If you have dry ink pads you can turn them upside down and store them like that for a bit. This will allow the ink to seep through to the pad and you will be able to use every last bit of ink. I store all my ink pads upside down in a drawer at all times. The only ones you don’t have to do this with (that I know of) is Stampin Up’s pads because of how they close.
Metal Embossing:
Dry emboss on Foil Pie tins. You will get some fabulous results and the thickness is perfect. You can also run the tins through your cuttlebug with some of your embossing plates. Doing this the possibilities are endless with what you can create. Backgrounds to charms or embellishments anything you can think of can be done.
Tearing:
Tear paper or vellum towards you to open up the layers
Un-Mounted Stamps:
As you may know, un-mounted stamps come without a cushioned layer on the back of them. There are products called Kling-on or Ez-mount available to attach to the back of these stamps. As a low-cost alternative, lay a cheap spongey mouse mat under your card or paper before stamping, which will do the same job & allow a much crisper image when stamping
Sticking Pressed Flowers:
When sticking pressed flowers onto your card with a wet glue, it pays to put a little glue onto a flat surface and use tweezers to pick up the flower and dip it into the glue, then add it to your work, as it saves messy fingers and short tempers.
That is about all i can think of for now..but as i remember more i will come back with a part 2 at a later date..
Showing posts with label greta adams. Show all posts
Showing posts with label greta adams. Show all posts
Sunday, June 21, 2009

Sunday, March 15, 2009
Photoshop Tip
Ever have a picture that would be perfect if it didn't have such and ugly or distracting background? or ever have a picture that you want to highlight something in it while minimizing the view of the rest of the photo? Well here is how you do it.
Now i am using PSE 5 but the instructions should still be pretty much the same.
Now i know it looks like a lot but trust me...this can be done in a matter of 5 minutes. I just did every step to show you without missing anything. it truly is only about 3 major steps. So don't feel overwhelmed.
here we go: **note** you will probably have to click the pics to enlarge it..this was the best i can do. grrrrr!!!!
This is my original pic

Step 1:

Open your photo. And make sure when you hit the edit button you are on full edit see the top left hand corner?
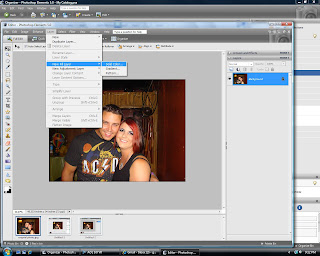
Go to Layer > New Fill Layer > Solid Color to create your photo overlay.
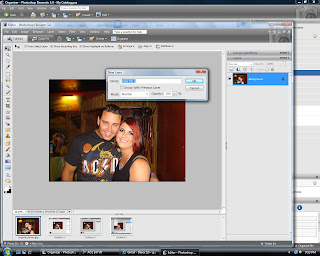
Click OK to create a new layer titled color Fill 1.
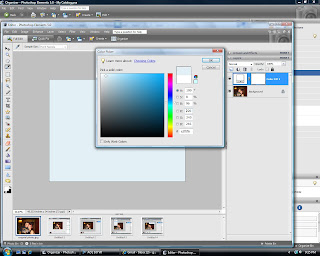
The color picker tool will appear. Select the color you would like your overlay to be and click OK.
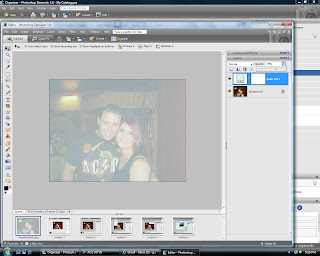
Your photo will fill with the foreground color you chose.
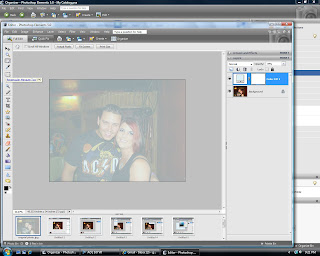
Slide the opacity slider at the top of the layers palette (top right hand corner) to about 50% ( i used 70% for this picture) You should see your original image to show up underneath the color overlay. Adjust the opacity to your likings.
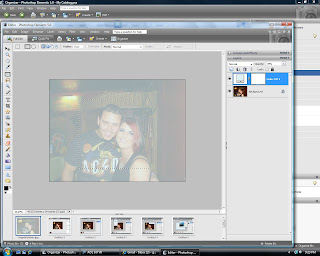
Select the Rectangle Marquee tool if you want square or the elliptical if you want oval or round. While holding down the shift key, draw a circle or square (whichever you choose around your photo's focal point. make sure the box in the lower left corner that has a black and a white square that BLACK IS ON TOP..if it is not hit the "d" key to change it.
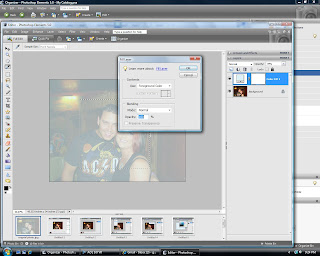
go to Edit > Fill Selection. in the fill dialog box choose foreground from the dropdown list and click ok. Mine is already done like this so i didn't have to change anything. You should see the overlay within the selection disappear, revealing the photo underneath. DO NOT deactivate this because we will be using it next. Your screen should look like this
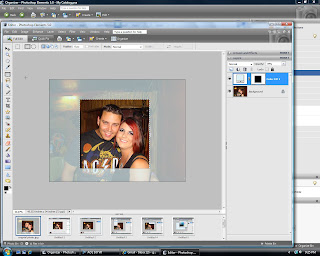
now go to Layer > New > Layer
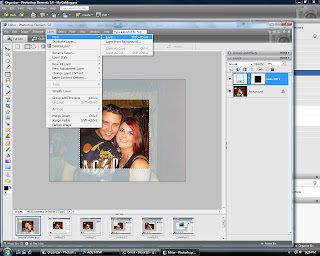
click ok.
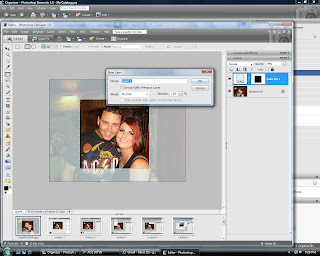
Now your forground color should now be White. If it is not white click "X".
Go to Edit > Stroke (outline) selection.
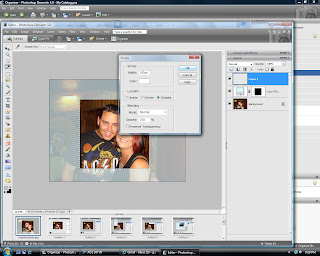
In the Stroke dialog box type 10 pixels for the width.
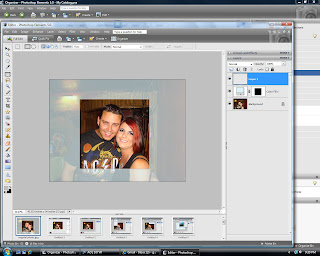
Click ok and print as you normally would do. You can flatten your image if you want to save a copy of the picture you just created.
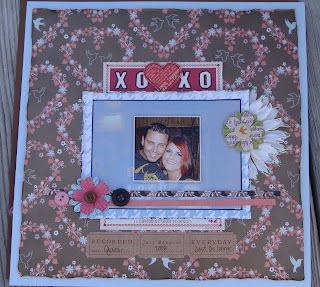
This is my final layout i did. What i actual did for this was printed 2 pictures just alike. I cut the box out of one picture and adhered it with pop dots to the other picture for more dimension.
Any questions feel free to shoot me an email (greta(dot)adams@gmail.com and i will try and help you.
have fun and I would love to see what you do using this tip!
Now i am using PSE 5 but the instructions should still be pretty much the same.
Now i know it looks like a lot but trust me...this can be done in a matter of 5 minutes. I just did every step to show you without missing anything. it truly is only about 3 major steps. So don't feel overwhelmed.
here we go: **note** you will probably have to click the pics to enlarge it..this was the best i can do. grrrrr!!!!
This is my original pic

Step 1:

Open your photo. And make sure when you hit the edit button you are on full edit see the top left hand corner?

Go to Layer > New Fill Layer > Solid Color to create your photo overlay.

Click OK to create a new layer titled color Fill 1.

The color picker tool will appear. Select the color you would like your overlay to be and click OK.

Your photo will fill with the foreground color you chose.

Slide the opacity slider at the top of the layers palette (top right hand corner) to about 50% ( i used 70% for this picture) You should see your original image to show up underneath the color overlay. Adjust the opacity to your likings.

Select the Rectangle Marquee tool if you want square or the elliptical if you want oval or round. While holding down the shift key, draw a circle or square (whichever you choose around your photo's focal point. make sure the box in the lower left corner that has a black and a white square that BLACK IS ON TOP..if it is not hit the "d" key to change it.

go to Edit > Fill Selection. in the fill dialog box choose foreground from the dropdown list and click ok. Mine is already done like this so i didn't have to change anything. You should see the overlay within the selection disappear, revealing the photo underneath. DO NOT deactivate this because we will be using it next. Your screen should look like this

now go to Layer > New > Layer

click ok.

Now your forground color should now be White. If it is not white click "X".
Go to Edit > Stroke (outline) selection.

In the Stroke dialog box type 10 pixels for the width.

Click ok and print as you normally would do. You can flatten your image if you want to save a copy of the picture you just created.
This is my final layout i did. What i actual did for this was printed 2 pictures just alike. I cut the box out of one picture and adhered it with pop dots to the other picture for more dimension.

Any questions feel free to shoot me an email (greta(dot)adams@gmail.com and i will try and help you.
have fun and I would love to see what you do using this tip!
Subscribe to:
Posts (Atom)


