


I want to start this off by saying I am by NO means an expert at taking pictures, and my pictures don't always turn out perfect, but I know a few tricks that can help you make sure that when you are posting picture online, you're able to represent your layout well!
1. Start off by taking your pictures outside, with NO flash (if possible). Most cameras have a setting to do this on the dial (one of those circles with slashes over a lightening bolt). You want to have natural shadows and coloring on your layout, and this is the best way to get it.
2. Be in INDIRECT sunlight. You don't want the sun to actually be hitting your page, so be on a porch, under the shade of a tree, or some other area that is outdoors, but not in direct sunlight.
3. Stand directly over your layout. You may have to get up on a chair to do this! Take a bunch of shots, not just one. You want to try to make sure that the layout is square in the frame... not a parallelogram!
 Get in different angles and get close up shots (zoom in!). We scrapbookers love to see the little details! To do this, use your "macro" setting on your camera (usually looks like a little flower or tulip).
 Sometimes I lean it up against something and stand away to get a good shot of it.
  If you take a picture of it in your yard, under a tree, make sure that this (below) doesn't happen! You don't want splotchy shadow! Try to get to where it's a solid shadow.
 4. Once you've taken your picture, then you want to do a little enhancing to make it truly shine! I'm using Picasa in this tutorial, because it's a free program available to anyone.
 Import the photo. Here's my shot from the front porch.
 To adjust the colors, brightness, etc., I love to use the handy "I'm Feeling Lucky" button. It usually fixes everything just right!
 To adjust the colors, brightness, etc., I love to use the handy "I'm Feeling Lucky" button. It usually fixes everything just right!
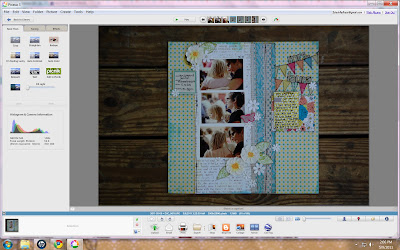
 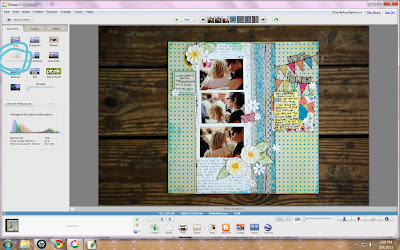 Here's a shot from in the yard. You can use the "Straighten" tool to get it a perfect square. Just look at the gridlines on the screen and line up one edge of the layout to them, using the adjuster on the bottom.
 Then crop, using the crop tool (manual). You'll just grab the edges and pull them in as close to the edges as possible.
Don't forget to enhance your close up shots, too. If "I'm Feeling Lucky" doesn't work for your pictures, you can also click on "Tuning" and adjust the brightness, etc.
 Here's my final results from my editing! (This was created for Lily Bee Designs! Go check out our blog today for some fun prizes!)

 Please leave me any questions if you have them, or tips we'd love to have!


2 comments:
Great tips!! And such a cute layout, V!!
Awesome, I was wondering what I was going to use now Picnik is ending :( You've sold me on the simpleness of picasa! Thanks!
Post a Comment