.

Saturday, July 31, 2010

T&T: "Organically" Placed Elements

I tend to overthink things, like the placement of little stars, or butterflies, or what the heck am I gonna post for my tip & technique...

Even though I love an artistic/grungy/shabby style to my layouts, I still think and think and think on how to make my elements look "just right." I really admire the designers that are able to make things look random, yet planned.

A few years back, when the "scattered" look first came into scrapbooking, I came across a blog (and I wish I still remember where it was- unfortunately, I don't!) where the designer was talking about the technique I'm about to share with you.

This is the layout I made... but it needed something else to make it finished. I started with a couple of stars, but they looked too "perfectly placed."
I punched out and inked/misted several more stars from coordinating patterned paper from the Office Party kit.

And this is the technique for making them look random: just drop them on the page. Ha! I leave a few where I think they look good and re-gather & drop the other ones.

I keep doing it until I'm happy with the final result. Then I adhere down with a mixture of tape runner & pop dots.
(This star is punched through the layout and the back is a scrap of Hambly overlay to create a little "window" in the page.)
I used the same technique with the butterflies on this layout below. I knew I wanted them in a rough line across the top, but again, I didn't want it to look too perfect.
I just love the little upside-down butterfly for some reason. I suspect it's because I know that if I were a butterfly, I'd probably be the one flying upside-down.
I added in a few other scattered embellishments to add to the look. (This layout is created with a mixture of Lily Bee Designs products & items from past NoelMignon kits.)

I'd love to see your take on these random elements !:)

Saturday, July 24, 2010

3-Dimensional Stars


The inspiration for these 3-D star elements on my page were inspired by this rustic barnwood star.


I cut out two 2.5" stars, one 3.5" star, and one 4.5" star for this page.

Using the Scor-It-All add a score line going from each tip of the star to the opposite indent, like this.


Continue around, scoring each of the five tips until you are finished.


Use your fingers to pinch and fold the star into shape.


Now it looks like this! :)


Stack a few foam dots together and adhere to the underside of your star. You are now ready to add it to your page.


Easy, right?!! :D Have fun!


Happy Scrapping!
Jana

Sunday, July 11, 2010

Dyeing Your Own Scrunchy Ribbon

Scrunchy ribbon is all the rage these days! I love the look of it on cards and scrapbook pages! It has that imperfect vintage feel to it! So here's the scoop on what you'll need...............Glimmer Mist, Seam Binding, used wet coffee grounds, and bowls. If you interested in purchasing seam binding, E-bay is a great place to buy it!
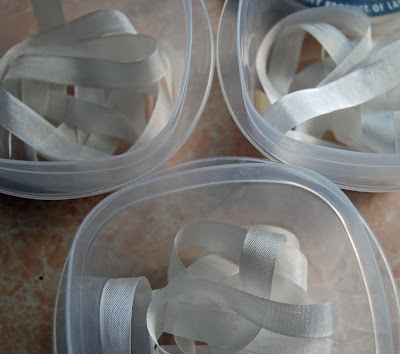
Step One: Cut seam binding to desired length and place in bowls.
Step Two: Spray and scrunch seam binding with Glimmer Mist. (The scrunching is necessary so that parts of the seam binding will be dark, other areas will be light!)
Step Three: Dump used WET coffee grounds over the wet seam binding. Scrunch again, let it sit and dry.


Step Four: Take the binding out of the bowls and put on a plate because it will dry faster that way. (Unless you have unlimited time.....then leave 'em in the bowls overnight!)
Step Five: After it is dry, shake and remove coffee grounds. This will be your beautiful end result! I love how there is variation in the colors and an aged look from the coffee grounds!

Here is an example of a candy package I created using my scrunched seam binding and Noel's Lemonade Stand kit. And yes.......I did pick out the correct colored M & M's so as not to clash with the papers! (Sick, I know! LOL!)


Thanks so much for stopping on by! Have a great week!!! : )

Sunday, July 4, 2010

Paper Rolling


Happy 4th of July! I created this layout for the Independence Challenge that starts next week over on the challenge blog and have a couple tips and techniques to share with you today. I'm going to turn 30 in January (yikes!) so I thought over the past decade of my life and jotted down a list of things that truly showed me gaining independence. I'm excited to see what my 30s will bring and it's amazing how much I accomplished and struggled during my 20s. I used the bright, fun Sun-Kissed kit to create this layout:


I placed the Jenni Bowlin butterfly rub-on on vellum and cut it out. I love the look this gives the butterfly as it allowed it to somewhat "flutter" off the page. :)


Here's a look at part of my title...the Cosmo Cricket chipboard alphabet was from my stash but the journaling block and flower are both in the kit.


I used a Maya Road kraft envelope to hide my journaling and dressed it up a little with a glittered flower, button and twine.


Here's a look at my journaling using one of the Echo Park journaling blocks...


And here's a tutorial for you on rolling patterned paper...First, I selected four different papers to work with. I wanted them to have some pattern to them but not have a lot of extra color. In my particular design, I wanted them to basically be monochromatic.


I cut the paper to 2" squares and cut 3 squares from each paper.


Next, I started rolling the paper from one end. You could always roll around something but I just used my fingers to work with the paper.


At the edge of my paper roll, I placed three glue dots to hold the paper in place.


Here's what one roll looks like....


And here's my finished embellishment on my layout. I adhered them to the page with glue dots and wrapped a ribbon around them to help tie them together. 


That's it! A fairly simple technique to give some extra dimension and color. I think these would also be cute as birthday candles on a birthday layout. 

Enjoy your holiday weekend! :)

Thursday, July 1, 2010

Mist and Layers

One of my favorite things to do on my layouts is to add a bit of texture in some form or fashion. Today I am going to show you a simple technique to add, not only a bit of texture, but also a one of a kind color fading look to your item. Take a quick look at the yellow/purple scalloped circle here.


To create this, first you will need to cut out a circle shape out of a scrap piece of paper. Then punch out several strips of white paper with your Martha Stewart Doily punch or some other punch of your choosing.

Place your punched strips in an empty box or cover your work area with newspapers. Choose 2 different shades of mist for this project. I used lemon mist from Maya Road and Chickadee mist from Shimmerz. Generously spray a bit of both mists on your punched strips. I think used some of my purple mist from Maya Road and splashed some of it on the strips to mimic spilt juice.

This part takes a bit of time but it is so worth it in the end. After your punched strips have dried, layer them on your circle as shown here.


Once you have layered all your strips, cut off the excess, and viola! You now have a textured circle with a unique faded color scheme.


Here is how I used my circle on my layout.


If you have any questions, feel free to ask them in the comments section. Happy creating everyone!

Tool Play: Acrylic Blocks!


Warning! The audio on this video is WONKY! You might want to turn the volume down a bit. I'm not a crazy yeller, I promise, I'm just havin' some issues with my webcam settings. Bear with me, ladies!